When your theme is installed, you will need to do a number of things to add basic content, pages, and galleries. To get started click:
THEME OPTIONS > QUICK SET UP
You will see the following instructions.
1. CHOOSE THEME AND CREATE PAGES. Go to the [Choose Theme] page. Choose your theme style and click Create Pages to quickly create a set of default pages: Home, Blog, Galleries, About, Contact.
(Note: By default, WordPress displays blog posts on your home page. Our Create Pages button will create a new Home page and move your blog posts to your Blog page. You can return to a conventional blog anytime by navigating to Settings > Reading, set the static pages to 'latest posts' > save. Next, navigate to the pages tab and set both 'Home' and 'Blog' page back to 'draft' > save.)
2. HOME PAGE. Upload a gallery to your Home page. Go to [Pages], click Home, and click the 'Add Gallery' button to upload images and create a gallery [more help docs] (you will need to have NextGEN Gallery installed to create galleries). Save your gallery and update your Home page.
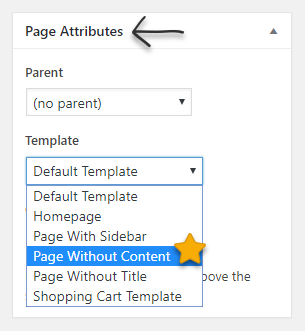
FULL SCREEN HOME PAGE: If you've selected a preset with a full screen home page, first confirm that you've created and set your 'Home' page as the Front Page display under Settings > Reading. Then go to your Home page to edit and select the "Page Without Content" page template in the 'Attributes' box.

You can then upload and select images in the Customize Theme > Global > Homepage Background section.
3. ABOUT AND CONTACT PAGES. Go to [Pages] and click About and Contact to add content to each page.
4. CREATE GALLERIES. Go to [Pages] and click Add New. Give the new page a name and click the 'Add Gallery' button to upload images and create a gallery [more help docs] (you will need to have NextGEN Gallery installed to create galleries). Save your gallery. When finished, on the far right below the Publish button, set the "Parent" page to Galleries to make the page a sub-menu item under Galleries. Repeat for as many gallery pages as you want.
5. ADD AN ALBUM. Add an Album [more help docs] - a collection of galleries (a gallery is a collection of images). Go to [Pages], click Galleries and click the 'Add Gallery' button to select your album and album display type (you will need to have NextGEN Gallery installed to create Albums). Choose the Album option and choose which galleries you want to display in your Album. Save and update your page.
6. BLOG POSTS. Publish your first blog post by clicking [Posts] and then Add New.
7. SIDEBAR AND FOOTER. Add content to your blog's sidebar and your footer area by going to the Appearance > [widgets] page and dragging widgets to the sidebar and footer areas. To add a copyright to your footer, go to our [Customize Footer page].
8. LOGO. Upload a custom logo on the [Customize > Header page].
9. CUSTOMIZE. Customize your site! The above steps will give you a website that looks like our demos. You can now customize as much as you want. Click [Theme Options > Customize Theme] to customize colors, fonts, spacing. Be sure to save your settings as a custom theme on the [Choose Theme] page. That way, if you ever make additional changes, you can always return to your saved settings and site appearance.
----
NEW TO WORDPRESS? Here are some tips.
THE DASHBOARD. The admin area of your website is known as the WordPress dashboard. Please note that all you need to manage your site is on the menu on the left.
PAGES VS POSTS. WordPress has two main forms of content, Pages and Posts. Any items that show up on your main menu, including galleries, are Pages. Posts, by contrast, are your blogs posts.
*To add and edit pages, click Pages. Click the name of a page or click Add New. Add a title, content, or images. You can also create a gallery, by clicking the 'Add Gallery' button. Click Publish and the page will appear on your menu.
*To add and edit blog posts, click Posts on the left. Click the name of a post or click Add New. Add a title, content or images. You can also add galleries to your posts by clicking the 'Add Gallery' button. Click publish and the new post will appear on your blog.
WIDGETS. You add content to your blog's sidebar by going to the Appearance > Widgets page and dragging widgets to the sidebar. The Photocrati theme also allows you drag widgets to your footer.
SETTINGS. You can change your site title, change how your site's URLs appear under Settings > Permalinks, and change other important settings by clicking the settings tab on the left.
PLUGINS. There are thousands of free third-party plugins you can add to your WordPress site. These allow you to add contact forms, integrate Twitter feeds, improve your SEO, create forums, and do hundreds of other things that are not a core part of WordPress. You can see your current plugins by clicking the Plugins tab. You can search the directory of plugins on the plugins page and click Install to quickly install any plugin you see there. Once installed, most plugins will add an extra menu item somewhere on the left where you can change the settings of the plugin.
*Important note: We cannot guarantee compatibility with any third-party plugins. Support for their features should be handled by their developers. We only provide support for our Photocrati Pro Theme features and our NextGEN plugin features.
PHOTOCRATI THEME OPTIONS. All the options for customizing your Photocrati Theme, including your theme style, colors, fonts, spacing, etc, are found under the Theme Options tab on the left.